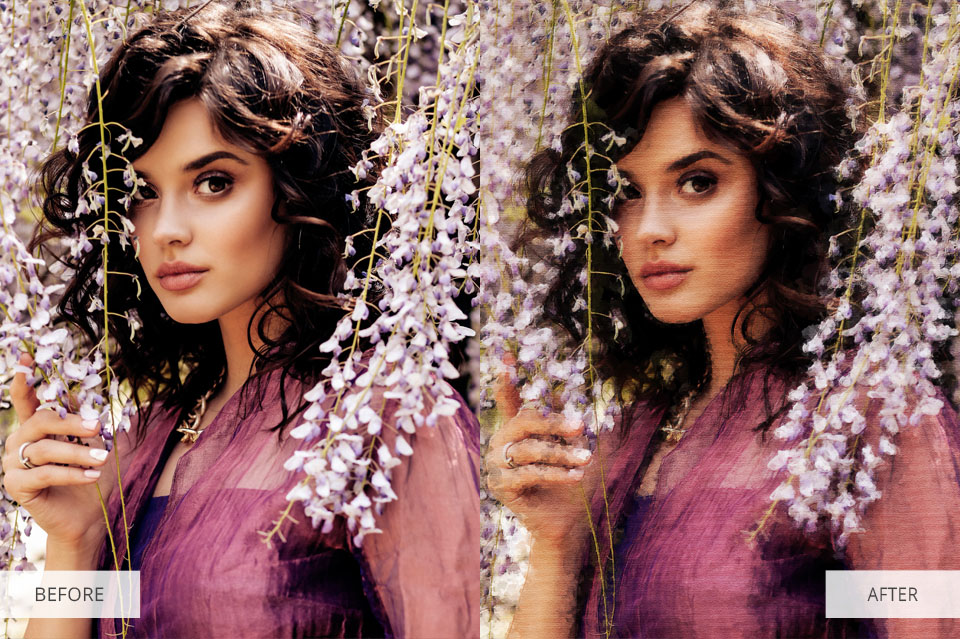
This guide will teach you how to make a photo look like a painting in Photoshop. There are two possible ways that will help you achieve this. Also, we will show you before/after images applying both techniques, so that you can see the result you will get.
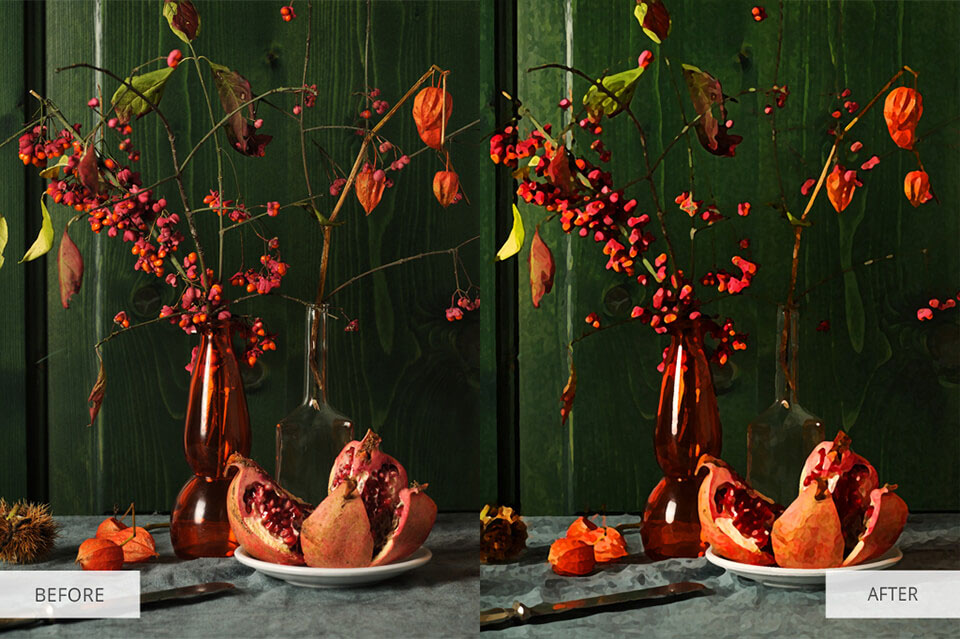
1st technique – Use the tools and in-built Photoshop filters. The advantage of this technique is that you can influence the result by applying various adjustments.
2nd technique – Use Photoshop actions for paint effects. The series of Ps actions have been created and recorded by their authors. They allow you to turn photo in painting in Photoshop in a few clicks.
Remember, if you want to achieve a professional result, you can always refer to professional turn photo into painting services. You will get a wonderful picture for only $25 per image within a 2-5-day period.
Photoshop Tutorial on How to Make a Picture Look Like a Painting
To use this technique, you need to install Photoshop on your PC from the Adobe official website. Alternatively, you can use Online Turn Photo Into Painting Editor.
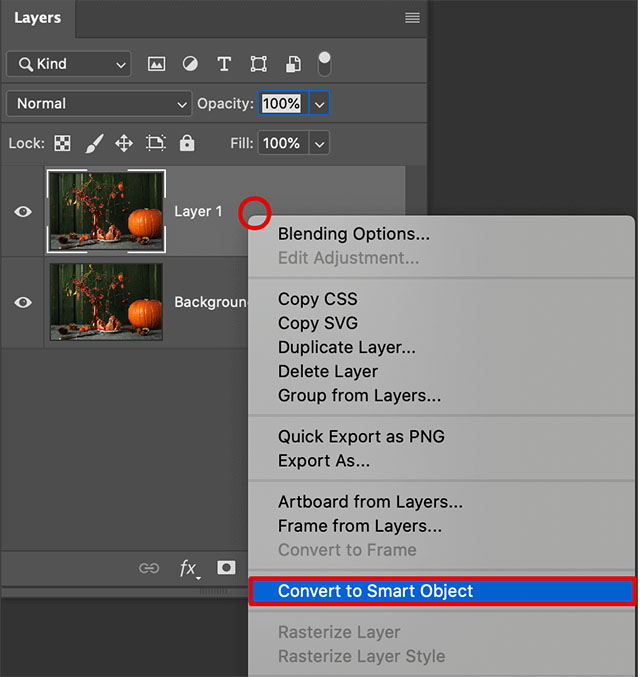
1. Open a Photo and Convert Layer to Smart Object
If you are using Photoshop, go to File > Open, choose a picture from your PC. In our case, it will be a still-life photo.
Find the panel of Layers in the lower-right corner of the screen. If it is not visible, go to Window > Layers. Click with the right mouse button on the Background layer and choose Convert to Smart Object.
This tool allows you to return and change the artistic filter to apply it in the next step. This is called a “nondestructive edit”, as the original picture remains unchanged, even after you have applied the effect.
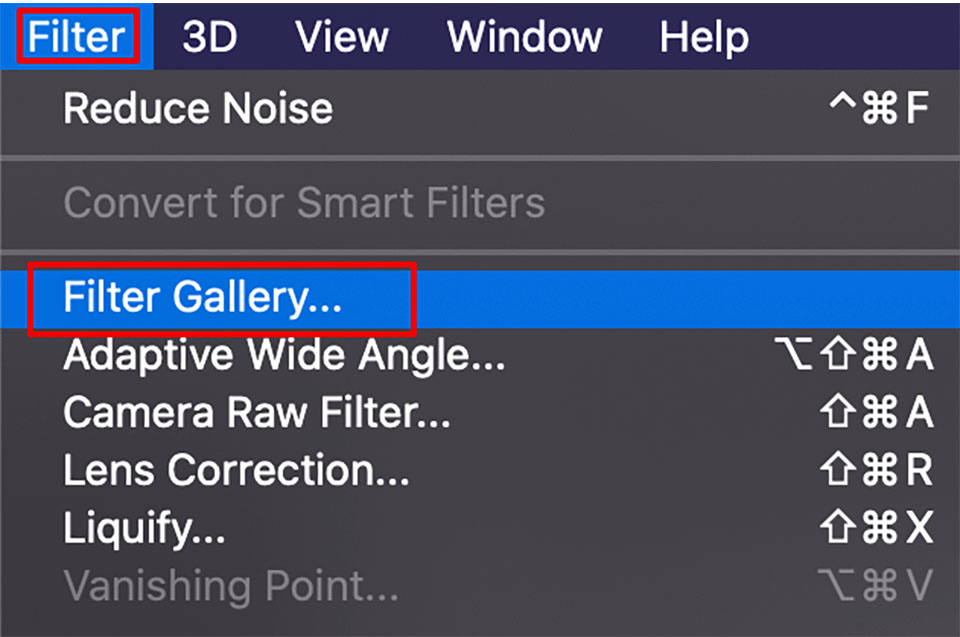
2. Open the Filter Gallery
Go to Filter > Filter Gallery. You will see a pop-up window with filters.
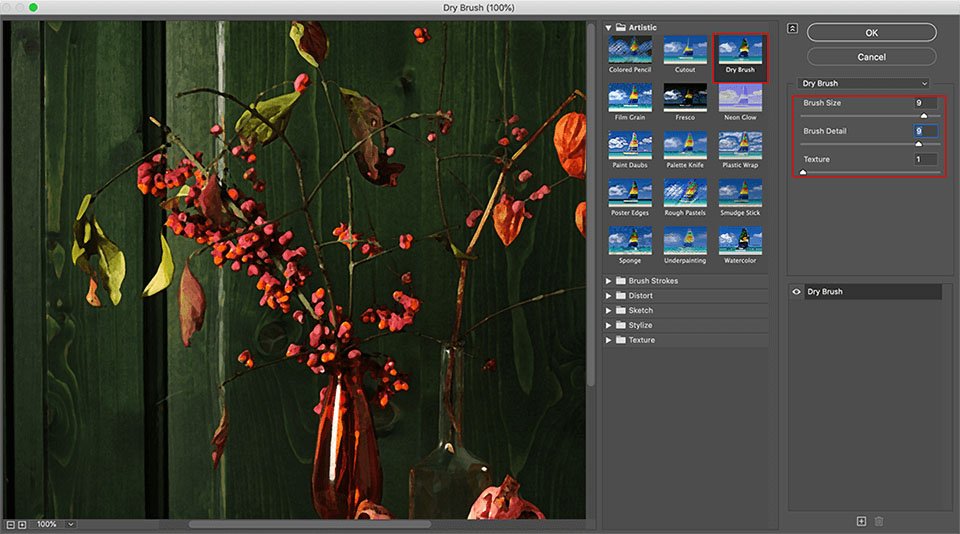
3. Apply the Dry Brush Filter
In the Artistic folder to the right of the preview, choose the Dry Brush filter.
The filter options will be on the right side of the screen. You need to adjust the Brush Size to 7, set the Brush Detail to 9 and the Texture to 1.
A useful tip: You can preview pictures by using the preview options, which can be found in the lower-left corner. If you want to preview the whole image, select Fit in View from the percentage drop-down menu.
Click OK when you finish.
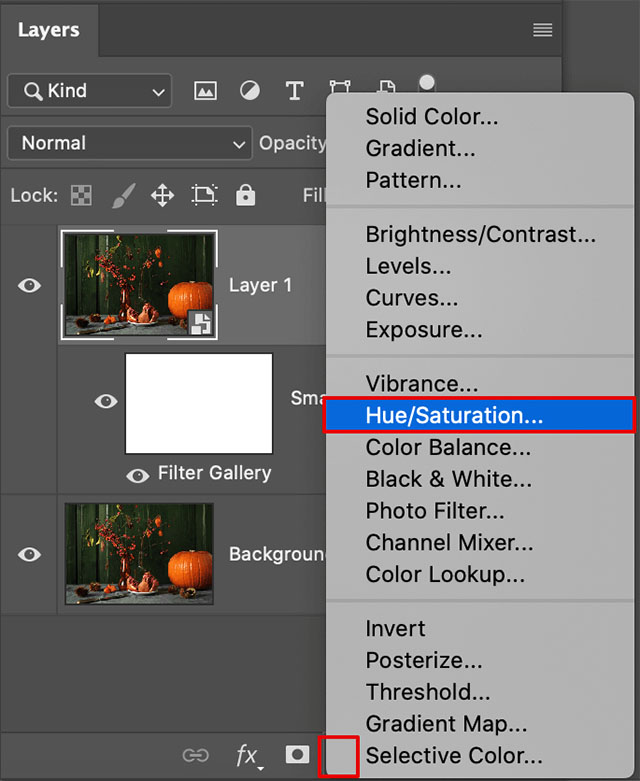
4. Intensify the Colors
Find the Adjustments panel above the Layer panel on the right side of your workspace. If it is not visible, go to Window > Adjustments.
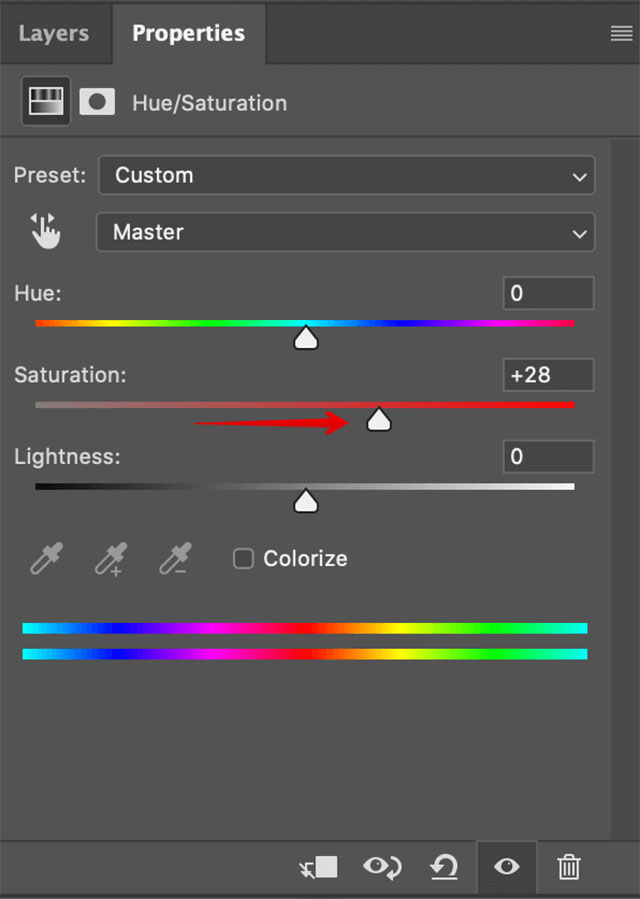
In the second row of icons, you will see the Hue/Saturation, click on the tab to adjust these settings.
You will see the Properties panel. Adjust the saturation to +65 using the Saturation slider. The colors in the picture will become more intense, and your image will start looking more like a painting. Then, close the panel by clicking on the Properties tab.
5. Make Fine-tune Adjustments (Optional)
We have already specified, that the applied alterations are non-destructive, so you can return and change them from the Layers panel.
You can also adjust Saturation. Make a double click on the icon to the left of the Hue/Saturation 1 layer in the Layerspanel, and the Hue/Saturation sliders will appear.
If you want to change the Dry Brush filter, you have to double-click on the Filter Gallery under Layer 0 in the Layers panel, and the Filter Gallery will open.
We recommend you apply this technique to various pictures and explore the filters in the Filter Gallery. Try adding the Rough Pastels filter to a picture with a large color area for a textured effect. With the Colored Pencil filter, you can turn a portrait photo into a sketch.
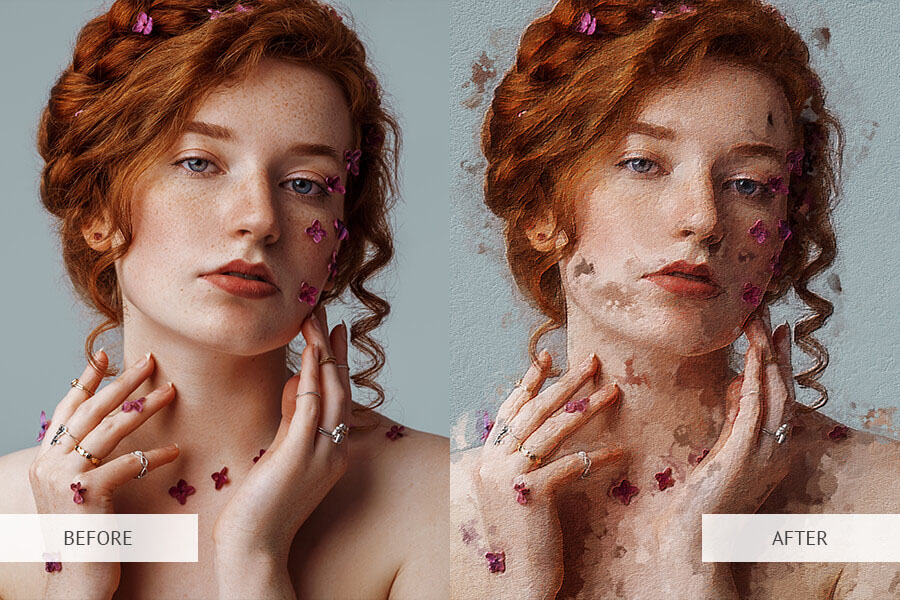
Using Photoshop Actions
Use Photoshop actions to make a photo look like a painting and enjoy the amazing result. If you want the picture to look more realistic, you can add more texture to it. If you are trying it for the first time, we recommend you using Oil Painting Photoshop Actions Collection. These actions are free and compatible with Adobe Photoshop CS3, CS4, CS5, CS6 and CC. You can use them to enhance photos of people, animals, landscapes, real estate and many more objects.
How to Install Photoshop Actions?
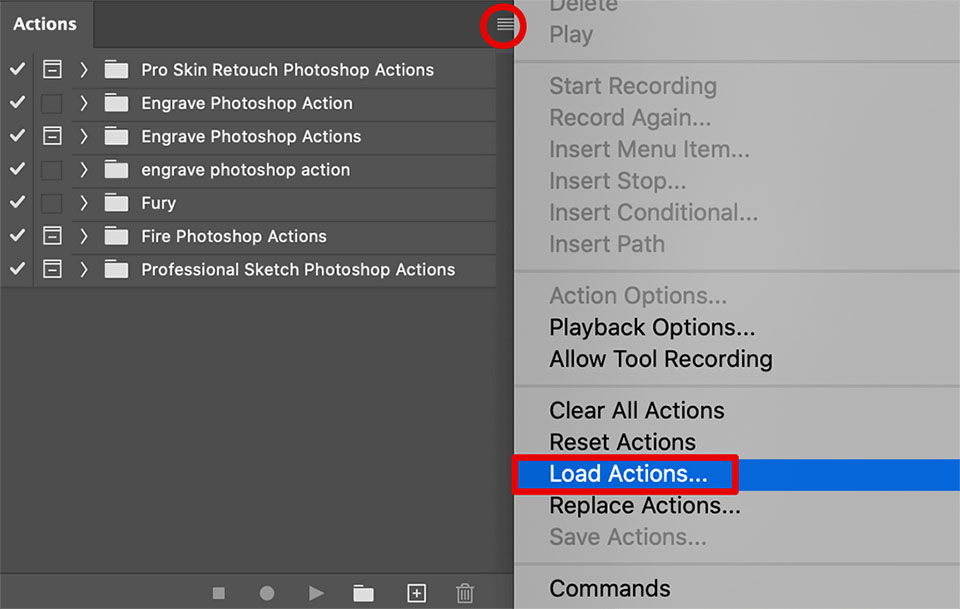
Start with opening the Actions window.
Use Alt + F9 shortcut or go to the Window tab > Actions.
In the Actions tab, begin the installation of the .ATN files.
Find the button with four bars, click on it and choose Load Actions.
Locate the required actions on the PC and choose Open. All the loaded actions will be saved in one list.
As you can see, the installation doesn’t take more than a minute. And this is the result you will get by applying one of the presets from this collection.
By the way, we recommend you try to make a photo look like a painting using both in-built instruments and actions. It will allow you to compare, which effect is better and how effective each technique is.
We use cookies to ensure that we give you the best experience on our website. If you continue to use this site we will assume that you are happy with it.AgreePrivacy Policy


Leave a Reply